How to: Make Your Own T-shirt Yarn

how-to-make-t-shirt-yarn-banner-image

According to the Council of Textile and Fashion Industries of Australia clothing is the fastest growing household waste in Australia. It is also the cause of much pollution and drains natural resources. Astoundingly it takes 2700 litres of water to produce the cotton for one t-shirt. Far from being a throw-away statistic, this number is significant. There are 663 Million people worldwide who don’t have access to safe drinkable water – that’s approximately 1 in 10.

For women especially, water scarcity is a deep and complex issue. In developing nations girls under 15 are twice as likely as boys to be the responsible family member for fetching water, with 64% of households relying on women to get the family’s water when there is no water source in the home. This takes valuable time away from educational opportunities and many young women are forced to drop out of school. This then has a trickle on effect as research has shown that for every 10% increase in women’s literacy, a country’s whole economy can grow by up to 0.3%

What can you do?

When it comes to fashion and helping the environment, simply reducing your consumption of clothing is the best possible action you can take. On average women wear only 20 to 30 percent of their wardrobe so most of us could make-do with considerable less by making better choices. Imagine how organized your wardrobe would be with less stuff too!

Upcycling clothing is a fantastic way of extending the life of the textiles you have. T-shirts are made from jersey fabric, a type of woven material that doesn’t fray when cut and often curls after being stretched out depending on what the fabric is made from. This makes it perfect for making into yarn and creating new items that will last.

step1-how-to-make-t-shirt-yarn_copy

Step 1. Find a new spot for your fluffy friend to rest whilst they oversee your activities.


step2-how-to-make-t-shirt-yarn_copy

Step 2. Use a pair of scissors to cut straight across under the arm-holes as well snipping off the bottom seam.

step3how-to-make-t-shirt-yarn

Step 3. For the moment, put aside the top and bottom sections leaving the middle section. These can be used to make other items. Then use your scissors to slice parallel cuts into your fabric, leaving around 2-3cm at the end of each cut. These should be approximately 3cm apart.

step4_how-to-make-t-shirt-yarn

Step 4. Put your arms through the body of the t-shirt then lay it back down so that the area that hasn’t been cut through is in the centre. Start by cutting off the end length closest to you at a 45 degree angle to create the beginning of the yarn. Then follow this strip around and cut so that it follows in a continuous piece.

*Note: Once you have got the hang of the technique, I find it easier to put the my arm through the centre and have the yarn fall off as I go but this is a clearer way to explain it while you are learning.

step6_how-to-make-t-shirt-yarn

Step 5. Use your hands to stretch the yarn bit by bit so that it lengthens and curls up.

step7_how-to-make-t-shirt-yarn

This is how your yarn should look at this point.

step8_how-to-make-t-shirt-yarn

Step 6. Roll your yarn into a ball and plan your first T-shirt yarn project.

How to: do Japanese Boro Stitching

procsilas-mosca

Image: Procsilas Mosca (Flickr)

Traditional Japanese boro cloths have a beauty like no other. Each cloth tells a unique story of its journey through life with patches carefully sewed on and reinforced with stitching, often over generations of a single family.

Boro is my antidote to the fast fashion world. The cloths can be viewed to embrace the concept of ‘wabi sabi’, that sees beauty in an object’s impermanence and imperfection.

Making a feature of garment repairs is an alternative to the art of invisible mending. Taking the time to create something really unique is a beautiful way of connecting with a garment or textile, and because mistakes and wonky stitching can be embraced it’s the perfect project for beginner sewers like me.

Recently I’ve been exploring images of boro cloths and sashiko stitching to add some inspiration into my repair repertoire.

boro-jacket-boro-mending-na0905

Image: na0905 (Flickr)

History of boro stitching

Although beautiful, boro cloths came about through pure necessity. During the 18th and 19th centuries cotton was a luxury afforded only to the nobility. The lower classes had homespun fibres that were more difficult to make into fabric and didn’t last as well. By patching and stitching, the fabric could be strengthend and its life could be extended. During the Edo era there were also laws that restricted lower classes from wearing bright colours which is why the cloths are indigo blue and brown. Boro textiles are now highly sought after collectibles.

During these times pieces of cloth were re-purposed in various forms. Often starting off as a kimono then becoming every day clothing, a piece of sleepwear, a futon cover, a bag then finally a dusting cloth. Every scrap was used until it wore out.

This relates to the Japanese philosophy of ‘mottaini’, which centres around wasting nothing of the intrinsic value on an object.

boro-mending-patches-stitching-lucy-portsmouth-boro

Image: Lucy Portsmouth (Flickr)

Contemporary stitching

Sashiko stitching started off as a functional running stitch for mending and reinforcing boro, but as cloth became less expensive it developed into decorative embroidery.

Each repair becomes a creative challenge. It’s a chance for the sewer to express themselves whilst also being an important time for contemplation and mindfulness.

This style of making embodies the ideals of slow fashion. This concept has varying definitions but generally involves the use of sustainable materials, spending an appropriate amount of time with the materials to make an item in order to value and connect to it, and exploring the emotional or spiritual dimension of the process.

Where could I try this?

Use your creativity to mend any of these items or more:

  • jeans or trousers
  • skirt
  • dress
  • shirt
  • coat
  • scarf
  • a bag
  • a quilt cover
  • a cushion
  • canvas shoe

boro-mended-jeans-heather

Image: Heather (Flickr)

What you I do need?

  • Sashiko or darning needle (a long needle with a small eye)
  • Sashiko thread, high twist cotton or embroidery thread
  • A ruler and fabric chalk or pen (if you wish to have neat lines)
  • Fusible webbing (optional for patching)

Types of stitches to try:

  • Parallel lines
  • Crosses or pluses
  • Chaotic lines
  • Boxes
  • Intersecting lines
  • Formal sashiko pattern
  • Long and short stitches

Tips

  • Use what you have and share resources with others
  • Look at images on Pinterest for inspiration
  • Make up your own designs and enjoy the process
  • Be playful and remember there is no such thing as making a mistake
  • If your thread is too thick try dividing it into two separate strands
  • Consider different textures of fabrics and threads
  • Consider different lengths and directions of threads
  • Think about how you can use stitch-free space as well to balance out a design
  • Old spools of cotton and silk thread as these will have a nicer finish than polyester mixes
  • Deconstruct pieces of fabric from unwanted textile items to use as patches
  • Consider using natural dyes if you can’t find the right colour match for your thread or fabric

Let us know how you went! Take an image and share it on our Facebook page!

How to grow your own micro-greens


We all know fresh is best but we don’t all have room to grow our own veggie patch. Micro-greens are a great alternative and it’s easy to get your little indoor garden established.


There’s not much room left in my backyard at the moment to plant more veggies so I thought it was a good time to give these a try.


I’ve run out of room in my backyard so I thought I’d give them a try.


Micro-greens are not a special variety of plants; they are simply the seedlings of some herbs and vegetables. Think of them as being a cross between sprouts and baby vegetables. You harvest them with scissors around the time when their first true leaves appear, when they are around 5-10cm high.


You will find that you will love their delicate texture, delicious flavour, and vibrant colours. Also, because you harvest just what you need, very little is wasted.


They are great for putting through salads, in sandwiches, or using as garnishes and you can even just munch on them as a snack. By using a pretty container they make a great window decoration too.


[Varieties of micro-greens via Noshtopia]


One of my favourites at the moment is broccoli. It might be small but it is packed full of nutrients and is known popularly as one of the super micro-foods. Broccoli contains high levels of sulphoraphane, an anti-oxidant with health promoting properties including having an effect on the bacteria linked to most stomach cancers and ulcers. Studies have shown that micro-greens have concentrated amounts of the nutrients found in their mature counterparts and broccoli micro-greens have up to 50 times as much sulphoraphane as fully grown broccoli.

You can sow them in seed raising mix or add paper-towel on top. I found using the paper-towel method was best for this seed.


For this you will need:

  • a container with drainage holes
  • seed raising mix
  • seeds
  • unbleached paper-towel
  • a water spray bottle


Container

Choose a shallow container with good drainage at least 5cm deep. A re-used plastic container with holes in the bottom works well and you can even put one of these inside a more attractive container.


I like to use bonsai pots that can be re-used for many years. For more substantial crops try a planter tray from a nursery. Fill it with a good quality seed-raising mix. Gently smooth out the surface of the mix to ensure even coverage of the seeds.


Seed

This can be purchased either from your local nursery or online seed store. It’s more economical to buy bulk packets and if you go in with friends it’s even cheaper. Avoid seeds treated with fungicide and ideally choose organic seeds.


Sprinkle seeds densely over the soil in your container. Remember you will be harvesting the plants early so they will cope with being much closer together than what you would normally plant. Stagger your planting of crops to ensure a consistent supply of micro-greens.


Watering

Mist with water, then cover with a piece of paper-towel cut to fit the shape of container. Keep this moist until the seeds have taken root in the soil. This will involve watering approximately twice a day. Remove the paper-towel when you can easily pull it away without lifting up a majority of the sprouting seeds. This usually takes around 3 days.


As the seeds sprout you will notice fine white hairs forming. Don’t worry; this is perfectly normal. These are the plant’s roots.


Positioning

Keep the containers on the kitchen bench then once the paper-towel has been removed move them to a windowsill or covered area outside where there is indirect sunlight and good air-circulation.


Harvesting

It’s up to you when you harvest your micro-greens. As a guide, it’s usually done when the first true leaves appear. For broccoli this will probably be between one and two weeks. Use scissors to cut the stems then rinse under water and use immediately.


For me, growing my own herbs and veggies is not just about having healthy organic food to eat and reducing my ecological footprint. I find that touching the soil, planting and tending seeds and connecting to the cycles of nature slows my mind and makes me feel more centered. Growing micro-greens is particularly mindful and a great activity to do after a busy day.

Get creative and experiment with decorating containers for growing your micro-greens. Soon your kitchen window will have it’s own little garden and you won’t get any fresher than harvesting food from your own kitchen!


Further Tips

  • If you don’t have soil, try growing your seeds on moist paper-towel instead.
  • Try growing other micro-greens such as mizuna, tatsoi, beetroot, spinach, sunflowers, fenugreek and snow peas. All seeds have specific conditions and temperature ranges they need in order to sprout and you will need to provide these for your seeds to grow. For the best results, plant seeds that are in season. In colder months most seeds will still grow but they might take a bit longer and might need a bit of extra care.
  • Try growing seeds produced for food consumption but always check if they are suitable for growing as micro-greens first.
  • In the warmer months try growing basil and red amaranth as micro-greens.


How to make your own upcycled t-shirt dog toy

dsc_0831

Your dog will adore this upcycled toy made from your old clothes. It’s a fabulous way of extending the life of an old t-shirt that in the best case scenario might end up as an industrial rag or be shipped overseas, and in the worst, will go to landfill.


I’ve made several of these for my dog Maya and they have all lasted well despite her vigorous play and the many adventures she has taken them on.


Fashion waste

Fashion waste is thought to be the fastest growing household waste in Australia with $500 million worth of clothing being taken to landfill in 2013. Imagine the impact if each of us both reduced our consumption of new clothing and upcycled our old clothes.


Cotton

One single t-shirt takes 2700 litres of water to produce which is particularly significant given that only one percent of the world’s water supplies are clean and accessible. Farming used for cotton production is extremely energy and chemically intense, and takes up agricultural land that could alternatively be used to produce food for local communities.


Donating to charities

If clothing items are unsuitable the charity incurs a disposal cost in taking them to landfill. Some charities sell on some clean and absorbent textiles for industrial rags and other textile by-products but you will need to check with the individual charities before donating.


Upcycling

Upcycling is a great way of prolonging the life of textiles by giving them a whole new purpose and delaying their trip to landfill. While it doesn’t solve the problem of textile waste, it does reduce the volume of materials needed for making new products. The process also gives us some time to think about the waste we are producing instead of simply placing it in a charity bin and walking away.

upcyled_dog_toy_maya

Making your upcycled t-shirt toy

These are really easy and quick to make. You can also use flannette from old pyjamas, fabric from tracksuit pants and tops, and even denim. I usually start by placing the knot between my knees.


Step 1: Find two old t-shirts. While there will be enough fabric in a t-shirt for an entire toy, a contrasting colour looks great. And this way you can also give one away to your dog’s best pal.


Cut four lengths of fabric from the t-shirts that are approximately equal in width and length. Do this by cutting across the t-shirt horizontally. Cut in a spiral if you need some extra length.

Depending upon what has been available to me I’ve made some quite small toys and also some chunkier ones that would suit a larger dog.

upcycled_t-shirt_dog_toy_step_2

Step 2: Lay the lengths out on a table and tie a secure knot at the end.

upcycled_t-shirt_dog_toy_step_3

Step 3: Position the knot in the middle of the table with the strips coming out into the shape of a cross.

upcycled_t-shirt_dog_toy_step_4

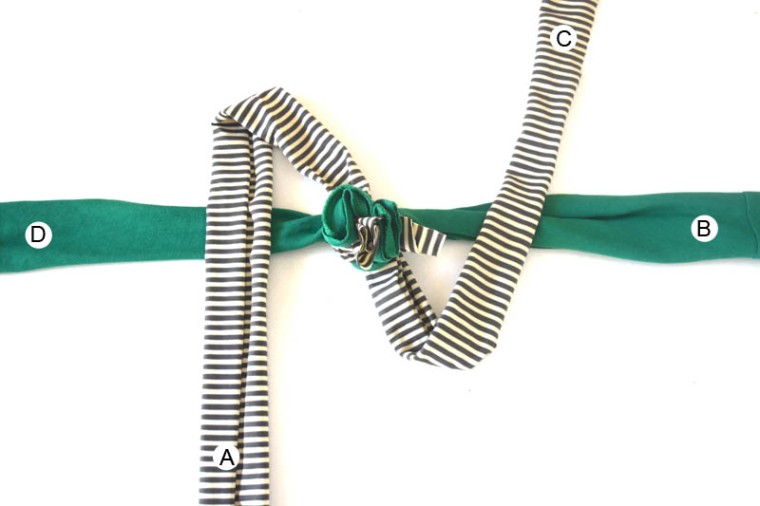
Step 4: Pick up strips A and C and create a loop with each before taking them to opposite ends of the table.

upcycled_t-shirt_dog_toy_step_4-5

Next gently pick up the two loops with your hand. Trust me, once you’ve done a couple of knot layers it’s a cinch!

upcycled_t-shirt_dog_toy_step_5

Step 5: Wrap B over C then under A.

upcycled_t-shirt_dog_toy_step_6

Step 6: Pick up D, wrap it over A, then under the loop made by C.

upcycled_t-shirt_dog_toy_step_7

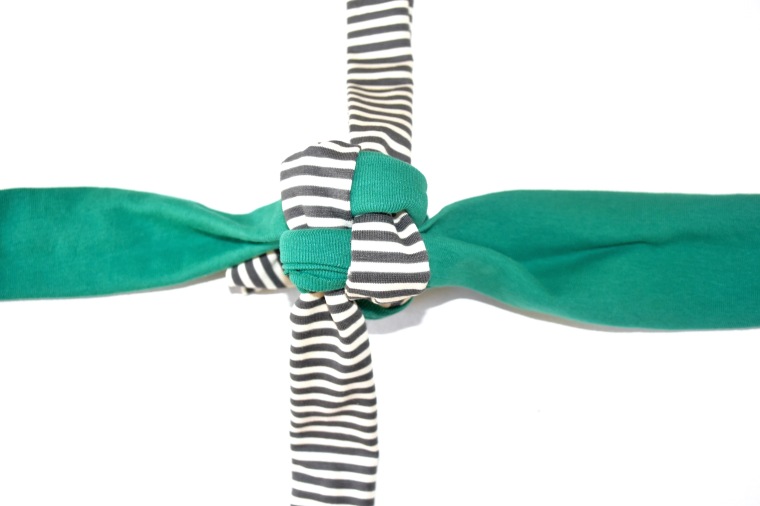
Step 7: You’ve now completed your first knot layer. Pull each strip to tighten it and make it neat and even.

upcycled_t-shirt_dog_toy_step_8

Step 8: Continue creating the next knot layer by taking two opposite strips to opposite ends, then thread the remaining two strips over and under. Alternate between using the two different colours to start the layer.


Give to your furry friend and enjoy a game of fetch or catch. Maya also likes to take hers to bed and snug up to it. I think she might find it comforting because it smell like me.


Have you made an upcycled toy for your dog? If so, post a picture below.

How to make the perfect cup of tea

gibson-girls

For many of us the ritual of tea provides a sanctuary in the day when we can find some peace and rejuvenate our energy. The hot fragrant tea in our cup is soothing and the process of making tea can be just as enjoyable.

Tea-time can also be a great time for exploring ideas and making life-changing plans. Here are ten tips for ensuring your next cup is brewed to perfection.

  1. Use fresh water

Pour fresh cold water into your kettle and turn it off when it has just boiled. Re-boiling water or letting water continue to boil de-oxygenates the water and this effects the taste of your tea. If you have tap water with a high mineral content try filtering your water.

  1. Choose the perfect cup

Select a cup that you associate with a positive memory and that feels nice to hold. Fine china or a delicate hand-made cup is best.

  1. Your teapot

Pre-heat china and earthenware teapots by filling them with boiling water to at least a quarter full and leaving them for 30 seconds. Clean your teapot by rinsing it with warm water. Never use soapy water or put a teapot in the dishwasher.

  1. Use the correct amount of tea

Use loose-leaf tea and ensure it has space to move about during the steeping process. Add the correct amount of tea depending on the variety. For black tea add 1 teaspoon per cup.

  1. Steep at the correct temperature

Different varieties of tea need to be brewed at specific temperatures. Black tea requires water just at boiling point. If green tea is brewed at boiling point it will taste bitter. You don’t need to get out a thermometer each time you make a cup of tea. Approximating the temperature will be just fine. Add some cold water or simply wait until the water cools.

  1. Steep for the correct length of time

A common mistake is to not steep your tea for long enough. For black tea the Royal Society of Chemistry suggest 3 minutes, while the British Standards Institution stipulate 6 minutes as being ideal. Ideally brew your black tea in one teapot then transfer the strained tea into a second teapot for serving so that the tea doesn’t over-brew. Some high quality green and oolong teas improve with further steeping so you can keep adding hot water to the teapot several times.

  1. Pour milk First

Dr Stapley from Loughborough Univeristy claims that adding milk to your cup first is the key. When it is put in second he found that the milk heats unevenly and denatures the proteins causing them to clump, affecting both the taste and the skin on top of the tea. Although George Orwell, in his essay ‘A nice cup of tea’, does have a point that pouring the milk second does allow you to more easily regulate the amount of milk you pour.

  1. Store well

Store your tea in an airtight container in a cool, dry place away from both direct sunlight and from strong smelling foods as tea easily takes on other odors. When tea is old it can taste bitter or bland so try and use it within the first 12-24 months. This doesn’t mean you need to throw out your tea after this time but knowing when it’s at its’ best means that you can plan ahead.

  1. Drink at its’ ideal temperature

Your tea will be best when it’s at it’s ideal drinking of between 60-65 degrees celcius. It will have developed its’ full flavour by this time and you won’t need to slurp to drink it. If you are in a hurry, the Royal Society of Chemistry recommends leaving a metal teaspoon in your cup.

  1. Make and drink mindfully

The ritual of making your tea is just as important as the cup of tea itself. Use your tea break to refocus your attention and enjoy being in the present moment. Smell the tea as you open the tin, listen to your kettle boil, watch the steam, feel the warmth of the cup, and savour the flavours of the tea in your mouth.

“Drink your tea slowly and reverently, as if it is the axis on which the world earth revolves
- slowly, evenly, without
rushing toward the future;
Live the actual moment.
Only this moment is life”

- Thich Nhat Hanh

Ultimately the perfect cup of tea is one that is made using the method that makes it taste best to you so experiment with variations, work out what you prefer and enjoy your own perfect cup of tea.

What’s your favourite way to enjoy tea?